Friday, July 26, 2019


Classic Ripple Baby Blanket


This gorgeous blanket uses double crochet, increases and decreases with a sweet picot border.  Easy to do once you have the counting down and of course the ice cream colours are heavenly! A perfect gift for new parents which they will treasure.

You will need:

1 x King Cole Cottonsoft DK White (W)
1 x King Cole Cottonsoft DK Apricot (A)
1 x King Cole Cottonsoft DK Apple (Ap)
1 x King Cole Cottonsoft DK Buttercup (B)
1 x King Cole Cottonsoft DK Rose (R)
5mm crochet hook
Tapestry needle
Scissors

Abbreviations
YO = yarn over
CH = chain
DC = double crochet
SC = single crochet
SS = slip stitch
FO = fasten off

DC3tog Decrease
YO, insert hook into chain and pull up a loop, YO and pull through two loops on your hook, YO, insert hook into next chain, pull up a loop, YO and pull through two loops on your hook (3 left on hook), YO, insert hook into next chain, pull up a loop, YO and pull through two loops on your hook (4 left on hook), YO and pull through all 4 loops left on you hook.


3DC Increase
DC 3 times in the same chain/stitch

The pattern uses multiples of 14 + 4.  I chained 88 which, with the border, ended up being 31" x 28" (80cm x 72cm) but will differ depending on your tension.

The pattern

CH88 in King Cole Cottonsoft DK Apricot

1, DC 4th from hook, * DC 5, DC3tog, DC 5, 3DC next, * repeat across row. You will finish with 5 DC, 2DC last, CH3 turn

2. DC base of turning chain, * DC 5, DC3tog, DC 5, 3DC next * repeat across row finishing with DC 5, 2 DC last, CH3 turn

Repeat row 2 for the whole blanket, drawing through a new colour as you complete the final stitch of the previous colour.  I completed 3 rows of each before changing colour.  See the picture for reference.

Colour pattern - 3 rows each A, B, W, Ap, R, W, A, B, W, Ap, R, W, A, B

FO and weave in all ends.

Picot border

DC around whole blanket in R.  For the sides I made 2 DC in each post.  Make 3 DC in each corner.
Change colour to A and SC around whole blanket again making 3 SC in each corner. Change to W and SC again around whole blanket.
Using white for the border *CH3, SS to base of chain, SC next, SC next *, continue all around the blanket.
FO and weave in ends


Saturday, July 20, 2019

Crossed Treble in raffia


Crossed Treble Stitch

An easy, decorative stitch perfect for bags.  Shown here in raffia it is also effective in any yarn to add texture and interest.


Sunday, July 7, 2019

UK V US

UK V US


No, not the Women's World Cup - crochet terms! A handy conversion chart for reference.

British vs American English Crochet Patterns
British English USA – American English
double crochet (dc) single crochet (sc)
half treble (htr) half double crochet (hdc)
treble (tr) double crochet (dc)
double treble (dtr) treble (tr)
triple treble (trtr) double treble (dtr)
miss skip
tension gauge
yarn over hook (yoh) yarn over (yo)

How To Read A Crochet Pattern

When I first started to crochet I watched many YouTube videos from talented and generous contributors. I learned the basics and then started to see fabulous crocheted items on Instagram and Pinterest and wanted to try them. Nothing like ambition! 

I would download a pattern and dive in - I became VERY good at frogging efficiently. Gradually I started to understand some of the rules of written patterns. The confusing string of letters and numbers started to make sense and I can now visualise what that string means and how it should look in my finished work.

I have discarded many patterns just because they were so difficult to read and so confusing.  All those rows and rounds in a solid block of text. You will understand them with time but as a beginner, try to stick with more simple patterns, clearly written with plenty of notes.

This blog is to give you some handy hints about how to approach a pattern, what to look for and how to break down the pattern into sensible bites before you get overwhelmed.  I hope it helps!

1.  READ THE PATTERN FIRST!
I cannot stress this enough.  The beginning notes contain a wealth of handy information that you will need! They were not put in just to fill up space.
As I teach crochet I know students like to get stuck in, jumping straight to the meat of a patterns and then get stuck because they are missing that bit of information THAT WAS IN THE NOTES!
(I hope this is not too many exclamation marks but it is important)

2. ADAPT TO THE MATERIALS YOU HAVE
Many patterns you will see will have affiliate links for materials.  The pattern writers are trying to make a living from their crochet work and will form relationships with yarn suppliers for example. This does not mean you have to use the exact same yarn but you do have to use the equivalent "type" of yarn to achieve the same result.  So if the pattern uses a double knitting yarn, then you need to do the same.
This is also where the gauge becomes relevant.  Many patterns will advise you of the gauge you need to achieve the finished size of your item. It will suggest that 10 stitches by 4 rows equals 10cm x 10cm, for example. This is important for fitted clothing. Don't shout but I do not always crochet up a swatch to check the gauge for items which are not dependant on it eg. blankets, bags etc.  
Eventually, you will be able to adapt the whole pattern for different weights of yarn but for now, stay with the pattern.

3. UNDERSTAND THE ABBREVIATIONS
All patterns will have a list of the abbreviations that they have used.  These will vary so it is important that you understand what they mean. Firstly is it a UK or US pattern? It can quickly become confusing if you are mentally translating stitches from one to the other as you go.  Many patterns will explain their method for bobbles, puff stitches, dc2tog, amongst others.  Read through and visualise what they are explaining.

4. GETTING TO THE PATTERN
Whew! All that and we haven't even started yet! Now is the time to pick up your hook ( the correct size of course) and get going.

The foundation chain or beginning ring will not be numbered as a row or round. 

The following rows or rounds will be numbered.  Each one will contain the stitches for the whole round or row.

You will be told if your turning chain counts as a stitch or not.

If a number is BEFORE the stitch, that number of stitches is placed in the same space.  For example 7hdc = 7 half double crochets into the same chain space.  (I see a fan coming on)

If a number is AFTER the stitch, that number is made in consecutive stitches along the row or round. For example hdc 9 = I will make a half double crochet in the next 9 chains

Brackets or parenthesis are used to enclose a group of different stitches that are all made in the same chain. For example (3dc, ch2 ,3dc) = I will make 3 double crochets, chain 2 and then a further 3 double crochets all in the same chain or space. 

Asterisks are used to show which group of stitches are to be repeated along the row or round.  for example *SC, DC,* repeat 10 times = I will alternate a single crochet with a double crochet until I have repeated it 10 times across the row.

You will come across some rows or rounds that are 3 lines long and look like you are trying to make a nuclear bomb. Slow down, break it down into sections, crochet slowly and try to understand what the end result will be.  Patterns have been tested many times so trust what you are being asked to do. 

I hope that these notes will help you in your crochet journey! It is a big jump to start reading patterns but you can do it.


Thursday, July 4, 2019


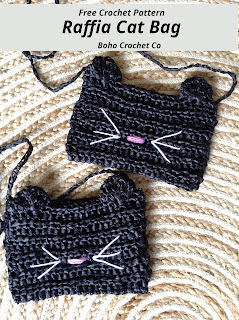
RAFFIA CAT BAG FREE PATTERN

It is time for holidays and which little person would not adore to have this cute raffia cat purse to hold all their precious bits and bobs?
Made from raffia and scrap cotton, it is super quick to make and will put a big smile on your kiddo's face. Result!

This pattern is for beginners but you will need to know some basic stitches and terms. I will be uploading some "How To" videos soon to have everything in one place for reference.  In the meantime, why not join your local crochet group? It is a lot of fun!

You will need:

50g ball of King Cole raffia in black
5mm crochet hook
Scrap bits of cotton in pink and white
Needle
Scissors

Abbreviations: US or (UK)

CH = chain
HDC = half double crochet (half treble crochet)
TR = treble crochet (double treble crochet)
SS = slip stitch
FO = fasten off

Notes: Raffia is stiff to work with so take your time and take breaks to stretch your fingers

The pattern:

CH 26

Turning chain counts as a stitch throughout.

1. HDC 2nd from hook and continue across. CH 2 Turn. (24 total)
2. HDC across. CH 2 Turn
3 - 23. Repeat row of HDC (23 row total)

24. HDC 3, (4TR, CH 1, 4TR) in same stitch, HDC 16, (4TR, CH 1, 4TR) in same stitch, HDC 3, FO


Already looking cute!

Now to add some detail.  It is much easier to sew on the nose and whiskers while your work is flat.
Using a needle and some scrap pink cotton sew the nose in the 8th row down from the ears, in the middle.  I doubled up my thread and made 3 overlapping simple stitches.  Tie the ends together firmly and trim.
Now with the white cotton using a single thread, sew on the whiskers. Again, tie off the ends firmly.


Nearly there!

With the right side inwards, flip up the bottom and sew up the sides with raffia. I simply used a whip stitch evenly and made sure that both ends were firmly secure.  Turn your bag inside out.


Handle:

Attach your raffia at a side seam and CH100.  SS to the opposite seam, SS next and FO.
Weave in all ends.
Super cute!

Enjoy your holidays and Happy Crocheting!


I have worked hard on this pattern so please do not use the photos or sell the pattern as it is.


Monday, July 1, 2019


Mustard Stripe Blanket
Free Pattern!


Sometimes I need to clear my head and there is no better way than to grab some gorgeous chunky yarn, a size 8mm hook and get stuck in to a project! The result is this fabulous mustard stripe blanket.  

An easy stitch that works up so fast you will have finished before you know it and so much texture! Ready to snuggle up over the winter?

The blanket is made with griddle stitch and I used 8 100g balls of King Cole Chunky Tweed in beige and mustard.  It has a fleck which adds to the texture and the two colours together are perfect. The finished blanket measures 125 x 105 cm (49 x 41 in) approx. but, of course you can make it the size you want by adding or subtracting foundations chains and rows.


You will need:
4 x 100g chunky yarn in one colour
4 x 100g chunky yarn in a second colour
8mm crochet hook
Needle for weaving in ends
Scissors

Abbreviations:
US (UK)
CH = chain
SC = single crochet (Double Crochet)
DC = double crochet (Treble Crochet)
FO = fasten off

The Pattern:

Turning CH counts as a stitch throughout.

CH 102 (or multiples of 2 plus 2CH to turn)

1. SC 2nd CH from hook, * DC, SC * Repeat along row ending with SC, CH 2 turn. (100 stitches)
2. *SC on top of DC from previous row, DC on top of SC from previous row* Repeat along row ending with SC in turning CH, CH 2 turn.

And that is it! Repeat row 2 throughout. Keep an eye on the amount of yarn you have left as you near the end of the ball and are ready to change colour to save having to undo half a row.  

FO and weave in ends.
Now grab a coffee, a couple of chocolate biscuits and find a box set to binge because it is snuggle on the sofa time! 
I hope you find this pattern useful. Feel free to leave a comment and Happy Crocheting!


Welcome!

Hi and welcome to my blog!

After much thinking and procrastinating I have decided to take the plunge and start a blog about all things crochet. Learning to crochet has been a great therapy for me in so many ways from the process of learning a new skill, getting creative with patterns and ideas, starting to teach and meeting so many lovely people.
My very first crochet group!

I hope this blog will be a way to share my ideas and patterns, encourage beginners to pick up a hook and connect with others who want to just slow down a little.

The joy of crochet is that you can be anywhere! Out in the garden, on a long road trip, on the train, waiting for the dentist - all you need is some yarn and a hook and you can switch off from the bustle and whip up a couple of rows. I warn you IT IS ADDICTIVE! It might be a character flaw but I have to finish a row before I can put my work down and sometimes I have to finish the whole thing before I stop. Housework is way, way down the list.

So please feel free to browse, leave comments and I am always happy to answer questions!


Raffia Cloud Placemat

Raffia Cloud Placemat Ready to dress up your table with these gorgeous placemats? Really fun to make as you see one side curl in and...